

开始
本站主题采用的是【CorePress-Pro主题】当然也有免费版本的。
但是站主人傻钱多嘛。就买了一个Pro版。其实两个版本差不都。
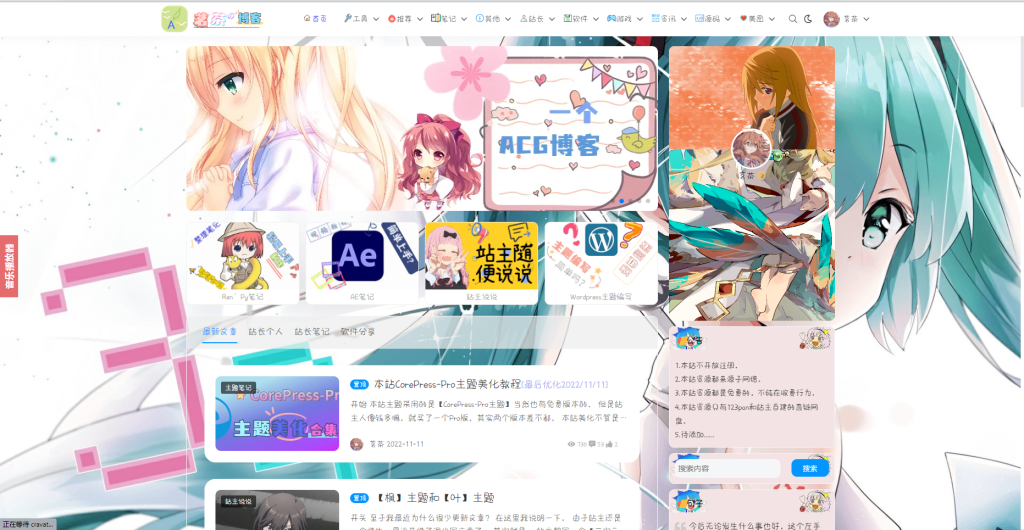
本站美化不算是特别的好看,但还是决定发出来给大家看,如果喜欢的话自行取走就是啦。
教程开始
1.站点随机背景图

我们来到果核主题设置
找到【外观设置】
往下滑动找到【背景图片设置】
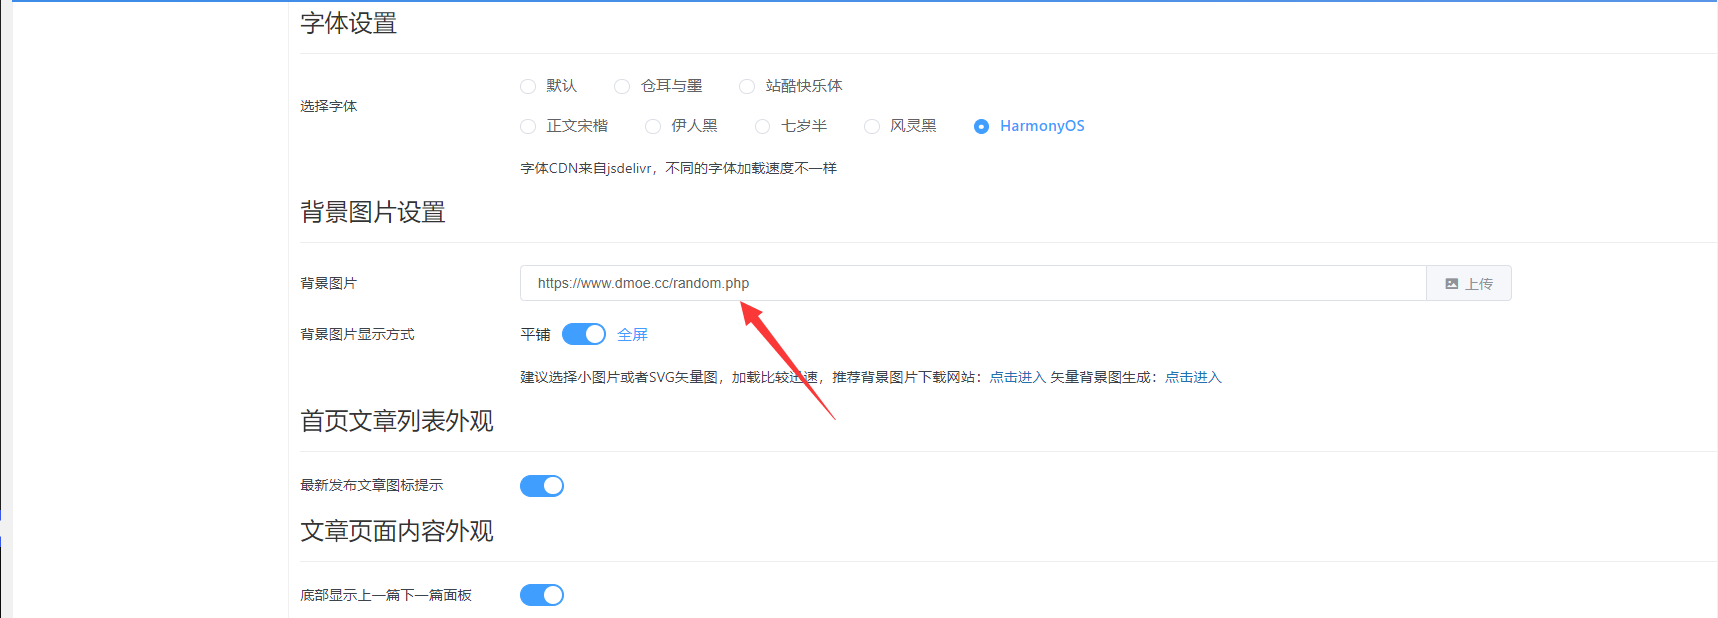
https://www.dmoe.cc/random.php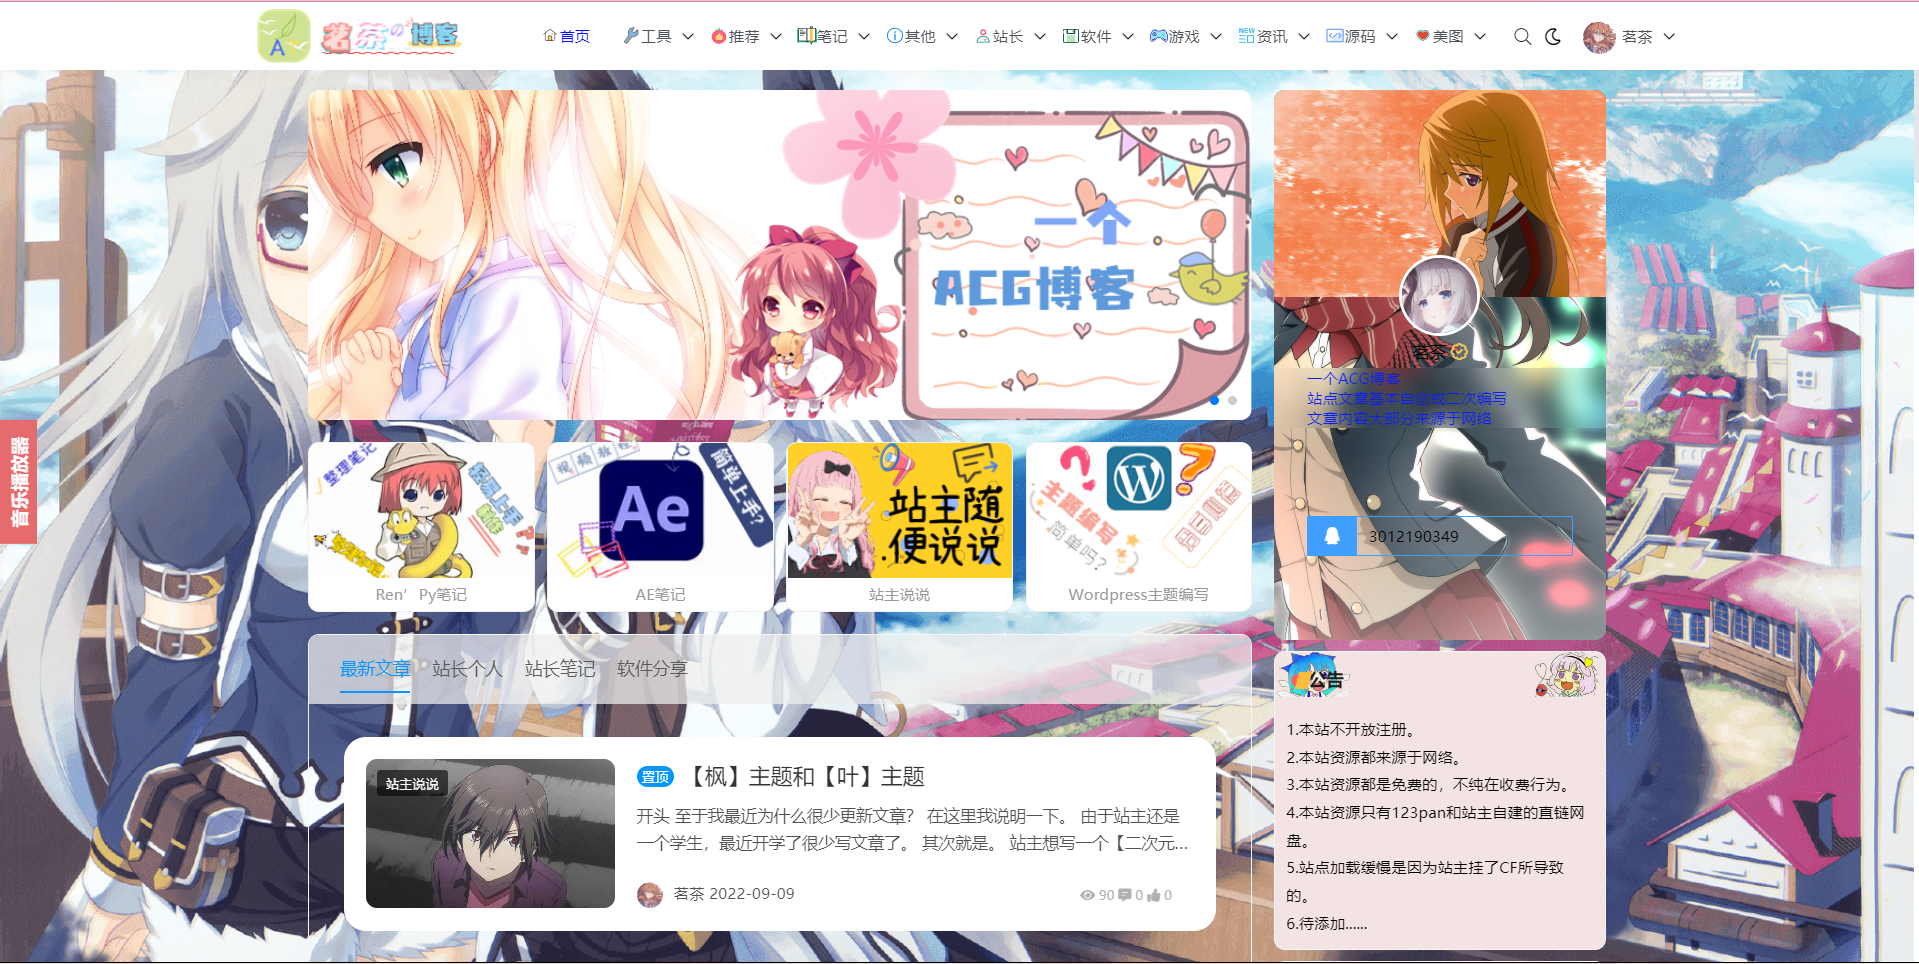
2.侧边栏背景图效果
在果核主题设置找到【插入代码】。
这里我就不放位置截图了,就在主题设置当中。
在【自定义CSS】内写入以下代码。

3.文章内容背景图
文章内容太过单调了,我觉得不符合我个人的口味。
就自行设计了一个背景,只需将以下代码添加到【自定义CSS】内即可。
/*文章内容修改*/
.post-content {
    padding: 30px;
    line-height: 1.6;
    color: #f56c6c;
    position: relative;
    background-image: url(https://www.tqlen.com/wp-content/themes/CorePress-Pro/static/img/wzbg.png);
    background-position-x: center;
}
/*
background-image: url(https://www.tqlen.com/wp-content/themes/CorePress-Pro/static/img/wzbg.png);中的图片代码可以自行修改,为了防止图片失效,请自行下载再上传到自己的站点。
*/
4.文章图片悬浮
文章图片就呆呆的挂在那。
感觉甚是奇怪,所以我自己给他添加了一个浮动效果。
让他生动满满,只需将以下代码添加到【自定义CSS】内即可。
/*文章图片动态效果*/
.post-content-content img {
     transition: All 0.4s ease-in-out;
    -webkit-transition: All 0.4s ease-in-out;
    -moz-transition: All 0.4s ease-in-out;
    -o-transition: All 0.4s ease-in-out;
}
.post-content-content img:hover {
    transform: translate(0, -10px);
    -webkit-transform: translate(0, -10px);
    -moz-transform: translate(0, -10px);
    -o-transform: translate(0, -10px);
    -ms-transform: translate(0, -10px);
    box-shadow:5px 5px 10px gray;
}
5.个人介绍部分修改【未完成版本】
原版的个人介绍我看着太普通了。
所以我就寻思给他改一下下。
就一下下而已。哈哈哈,不多说了,开始教程。
接下来我将开始保姆级别的教学。
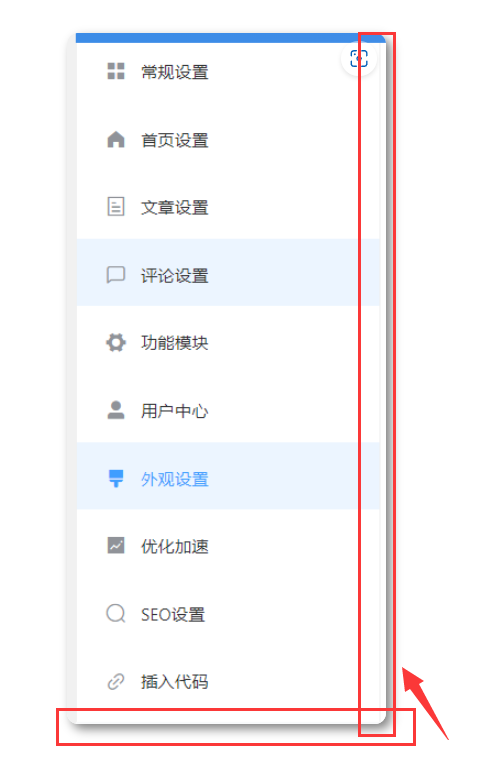
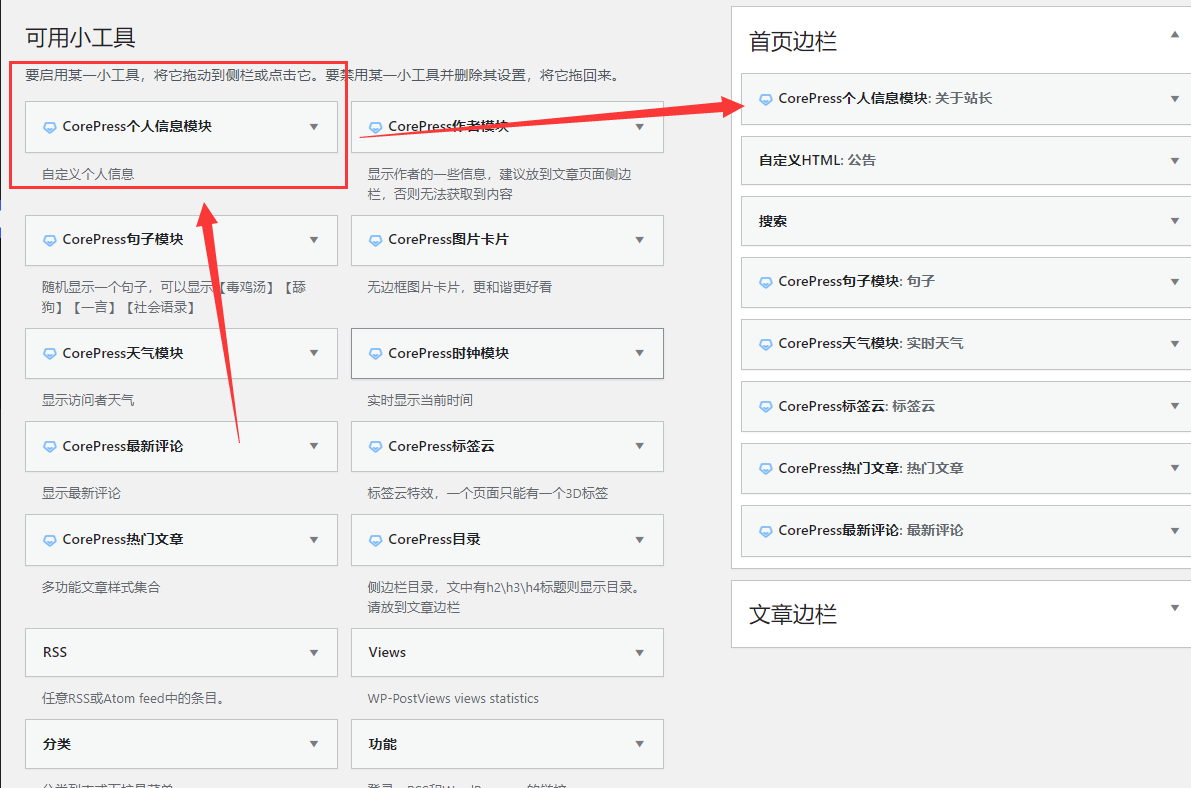
我们来到后台的侧边栏,点击【主题>小工具】
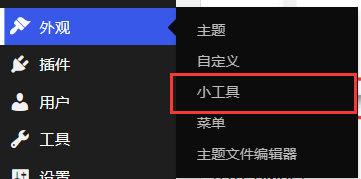
找到【CorePress个人信息模块】
将他拖到首页侧边栏下面。
你就会发现首页有一个个人信息介绍啦~
然后再将以下的代码添加到【自定义CSS】中
/*侧边栏个人介绍头像*/
.widget-admin-author-avatar img {
    height: 74px;
    width: 74px;
    border: 3px solid #fff;
    border-radius: 50%;
    background: #fff;
    margin-top: 80px;
}
/*个人介绍头像上面的图片*/
.widget-admin-author-background_image img {
	max-height: 220px;
}
/*个人介绍的QQ位置*/
.widget-admin-author-contact {
margin-top: 80px;
}
/*侧边栏个人介绍背景*/
.widget-admin-author-plane {
    position: relative;
    border-radius: var(--border-hd);
    overflow: hidden;
    background: #fff;
    margin-bottom: 10px;
    text-align: center;
    padding-bottom: 20px;
    background-image: url(https://api.amogu.cn/api/acg);
    background-position-x: center;
    background-size: cover;
    height: 500px;
}
/*侧边栏个人介绍文字*/
.widget-admin-author-introduce {
    margin-top: 5px;
    font-size: 14px;
    color: #0b1efd;
    backdrop-filter: blur(10px);
}
6.首页文章鼠标移入效果
文章挨得太紧密了,看的我是真的难受。
索性我就给他稍微的修改一下把…….
把以下代码添加到【自定义CSS】中。
/*首页背景文章透明*/
[cp-post-item] {
    display: flex;
    padding: 24px;
    background-color: #fff;
    border-bottom: 1px solid #f5f6f700;
    transition: .3s;
    align-items: stretch;
    position: relative;
    border-radius: 20px;
    margin-right: 32px;
    padding: 20px;
    margin-left: 32px;
    margin-top: 30px;
    transition: All 0.4s ease-in-out;
    -webkit-transition: All 0.4s ease-in-out;
    -moz-transition: All 0.4s ease-in-out;
    -o-transition: All 0.4s ease-in-out;
}
.post-list-page-plane {
    background-color: #fff0;
}
.list-plane-title {
    background: #edededba;
    padding: 19px 8px;
    border-bottom: 1px solid #f5f6f700;
    white-space: nowrap;
    overflow: auto;
}
/*首页动态效果*/
[cp-post-item]:hover {
    background: #edededba;
    transform: scale(1.1);
    -webkit-transform: scale(1.1);
    -moz-transform: scale(1.1);
    -o-transform: scale(1.1);
    -ms-transform: scale(1.1);
    box-shadow:5px 5px 10px gray;
}
/*首页底部加载上边距*/
.pages {
    background: #edededba;
    margin-top: 20px;
}
7.手机页面侧边导航栏美化
嘛,也没什么多说的。
就是美化了一下侧边栏而已。
还是老样子将以下代码添加到【自定义CSS】中啊。
/*侧边导航栏背景颜色*/
.drawer-menu-list {
    position: relative;
    flex: 70%;
    max-width: 400px;
    background: #ffffffba;
    overflow-y: auto;
}
/*侧边导航栏条框*/
.menu-mobile .menu-item a {
    display: block;
    color: #4e5358;
    font-size: 14px;
    padding: 10px;
    margin: 4px 2px 4px 2px;
    border-radius: 1rem;
    border: 1px solid rgb(125 191 255 / 80%);
}
/*侧边导航栏向下拉选项*/
.menu-mobile .mobile-m-dropdown {
    position: absolute;
    right: 1rem;
    top: 0;
    width: 48px;
    text-align: center;
    font-size: 14px;
    line-height: 38px;
    background: rgba(136, 173, 255, 0.88);
    border-radius: 8px;
    padding: 0px 12px;
    margin: 2px 0px 0px;
}
8.四季轮播图
我自己制作了四个四季轮播图。
轮播图是按照【CorePress-Pro】的尺寸设计的。
如要适用其他主题,也不是不行,就是尺寸问题自己解决。
以下是图片地址

9.给自己站点添加一个播放器
我之前是使用【APlayer】播放器的。
但由于添加歌曲实在麻烦【有简单的但我没去看。】
索性我就换了一个播放器。就是本站一直用的这个播放器。
以下是教程
10.给右侧添加个人信息
本教程设计到PHP。
关于【文章数量】【标签数量】【评论数量】【友链数量】都会随着网站而变化哦~
修改不是特别难,只需要你复制粘贴就行了。
本次美化是以小工具形式呈现的。
【此次修改借助了WIIUII 统计小工具二改而成的。】
嘛~话不多说,开始我们的教学吧!!!
首先我们在主题的目录下新建一个名为【geren.php】的文件
然后将以下代码添加到【geren.php】文件内
以下是PHP的代码
<?php
//茗茶的个人统计页面
//根据WIIUII而二改成的。
class EfanWebsitestat extends WP_Widget{
  function __construct(){
    // 定义小工具的构造函数
    $widget_ops = array('classname' => 'geren', 'description' => '显示个人用户数据');
    parent::__construct(false,'茗茶 个人用户数据', $widget_ops);
  }

  function form($instance){
    // 表单函数,控制后台显示
    // $instance 为之前保存过的数据
    // 如果之前没有数据的话,设置默认量
    $instance = wp_parse_args(
      (array)$instance,
      array(
        'title' => '显示个人用户数据',
        'establish_time' => ''
      )
    );

    $title = htmlspecialchars($instance['title']);
    $establish_time = htmlspecialchars($instance['establish_time']);
    $img_avatar = htmlspecialchars($instance['img_avatar']);

    // 表格布局输出表单
    $output = '<table>';
    $output .= '<tr><td>标题</td><td>';
    $output .= '<input id="'.$this->get_field_id('title') .'" name="'.$this->get_field_name('title').'" type="text" value="'.$instance['title'].'" />';
    $output .= '</td></tr><tr><td>建站时间:</td><td>';
    $output .= '<input id="'.$this->get_field_id('establish_time') .'" name="'.$this->get_field_name('establish_time').'" type="text" value="'.$instance['establish_time'].'" />';
    $output .= '</td></tr></table>';
    echo $output;
  }

  function update($new_instance, $old_instance){
    // 更新数据的函数
    $instance = $old_instance;
    // 数据处理
    $instance['title'] = strip_tags(stripslashes($new_instance['title']));
    $instance['establish_time'] = strip_tags(stripslashes($new_instance['establish_time']));
    return $instance;
  }

  function widget($args, $instance){
    extract($args); //展开数组
    $title = apply_filters('widget_title',empty($instance['title']) ? ' ' : $instance['title']);
    $establish_time = empty($instance['establish_time']) ? '2021-01-01' : $instance['establish_time'];
    echo $before_widget;
    echo $before_title . $title . $after_title;
    echo '<div class="widgest-boys"><ul>';
    $this->efan_get_websitestat($establish_time);
    echo '</ul></div>';
    echo $after_widget;
  }

  function efan_get_websitestat($establish_time){
    // 相关数据的获取
    global $wpdb;
    $count_posts = wp_count_posts();
    $published_posts = $count_posts->publish;
    $comments_count = $wpdb->get_var("SELECT COUNT(*) FROM $wpdb->comments");
    $time = floor((time()-strtotime($establish_time))/86400);
    $count_tags = wp_count_terms('post_tag');
    $count_pages = wp_count_posts('page');
    $link = $wpdb->get_var("SELECT COUNT(*) FROM $wpdb->links WHERE link_visible = 'Y'");
    $users = $wpdb->get_var("SELECT COUNT(ID) FROM $wpdb->users");
    $last = $wpdb->get_results("SELECT MAX(post_modified) AS MAX_m FROM $wpdb->posts WHERE (post_type = 'post' OR post_type = 'page') AND (post_status = 'publish' OR post_status = 'private')");
    $last = date('Y-m-d', strtotime($last[0]->MAX_m));
    $total_views = $wpdb->get_var("SELECT SUM(meta_value+0) FROM $wpdb->postmeta WHERE meta_key = 'views'");
    // 显示数据
    //img标签更换头像
    //a标签更换自己的QQ链接和邮箱地址
    $output = '<div class="mycs_user">
    <div class="mysc_lines"></div>
    <div class="mycs_imgBx">
      <img src="https://www.tqlen.com/wp-content/uploads/2022/11/QQ图片20211210225957.jpg" alt="">
    </div>
    <div class="mycs_content">
      <div class="mycs_details">
        <h2 class="mycs_h2">茗茶<br><span class="mycs_span">一个技术宅啊~</span></h2>
        <div class="mycs_data"><h3 class="mycs_h3">';
    $output .= $published_posts;
    $output .= '<br><span  class="mycs_span">文章</span></h3>';
    $output .= '<h3 class="mycs_h3">';
    $output .= $comments_count;
    $output .= '<br><span  class="mycs_span">评论</span></h3>';
    $output .= '<h3 class="mycs_h3">';
    $output .= $count_tags;
    $output .= '<br><span  class="mycs_span">标签数</span></h3>';
    $output .= '<h3 class="mycs_h3">';
    $output .= $link;
    $output .= '<br><span  class="mycs_span">友情链接</span></h3>
    </div>
        <div class="mycs_actionBtn">
					   <a scr="https://www.tqlen.com/"><button class="mycs_button">QQ</button></a>
          <a scr="https://www.tqlen.com/"><button class="mycs_button">邮箱</button></a>
        </div>
      </div>
    </div>
  </div>';

    echo $output;
  }
}
function EfanWebsitestat(){
  // 注册小工具
  register_widget('EfanWebsitestat');
}
add_action('widgets_init','EfanWebsitestat');
?>
然后将以下代码放在【functions.php】文件内
代码如下
//引用小工具
include("geren.php");
最后我们新建一个CSS文件
这里我的CSS文件命名为【mycs-geren.css】
然后将以下CSS代码添加到里面
最后在主题设置>插入代码中引用自己创建的CSS文件即可
.mycs_user {
  position: relative;
  /*width: 350px;*/
  height: 190px;
  background: #333;
  transition: 0.5s;
}

.mycs_user:hover {
  height: 450px;
}

.mycs_user .mysc_lines {
  position: absolute;
  inset: 0;
  background: #000;
  overflow: hidden;
}

.mycs_user .mysc_lines::before {
  content: '';
  position: absolute;
  top: 50%;
  left: 50%;
  width: 600px;
  height: 120px;
  background: linear-gradient(transparent, #45f3ff,#45f3ff,#45f3ff,transparent);
  animation: animate 4s linear infinite;
}

@keyframes animate {
  0% {
    transform: translate(-50%, -50%) rotate(0deg);
  }
  100% {
    transform: translate(-50%, -50%) rotate(360deg);
  }
}

.mycs_user .mysc_lines::after {
  content: '';
  position: absolute;
  /* https://developer.mozilla.org/en-US/docs/Web/CSS/inset */
  inset: 3px;
  background: #292929;
}

.mycs_user:hover .mycs_imgBx {
  width: 250px;
  height: 250px;
}

.mycs_user .mycs_imgBx {
  position: absolute;
  top: -50px;
  left: 50%;
  transform: translateX(-50%);
  width: 150px;
  height: 150px;
  background: #000;
  transition: 0.5s;
  z-index: 10;
  overflow: hidden;
}

.mycs_user .mycs_imgBx::before {
  content: '';
  position: absolute;
  top: 50%;
  left: 50%;
  width: 500px;
  height: 150px;
  transform: translate(-50%, -50%);
  background: linear-gradient(transparent, #ff3c7b,#ff3c7b,#ff3c7b,transparent);
  animation: animate2 6s linear infinite;
}

@keyframes animate2 {
  0% {
    transform: translate(-50%, -50%) rotate(360deg);
  }
  100% {
    transform: translate(-50%, -50%) rotate(0deg);
  }
}

.mycs_user .mycs_imgBx::after {
  content: '';
  position: absolute;
  inset: 3px;
  background: #292929;
}

.mycs_user .mycs_imgBx img {
  position: absolute;
  top: 10px;
  left: 10px;
  z-index: 1;
  width: calc(100% - 20px);
  height: calc(100% - 20px);
  /* filter: grayscale(1); */
}

.mycs_user .mycs_content {
  position: absolute;
  width: 100%;
  height: 100%;
  display: flex;
  justify-content: center;
  align-items: flex-end;
  overflow: hidden;
}

.mycs_user .mycs_content .mycs_details {
  padding: 20px;
  text-align: center;
  width: 100%;
  transition: 0.5s;
  transform: translateY(150px);
}

.mycs_user:hover .mycs_content .mycs_details {
  transform: translateY(0px);
}

.mycs_user .mycs_content .mycs_details .mycs_h2 {
  font-size: 1.25em;
  font-weight: 600;
  color: #45f3ff;
  line-height: 1.2em;
}

.mycs_user .mycs_content .mycs_details .mycs_h2 .mycs_span {
  font-size: 0.75em;
  font-weight: 500;
  opacity: 0.5;
  color: #fff;
}

.mycs_user .mycs_content .mycs_details .mycs_data {
  display: flex;
  justify-content: space-between;
  margin: 20px 0;
}

.mycs_user .mycs_content .mycs_details .mycs_data .mycs_h3 {
  font-size: 1em;
  color: #45f3ff;
  line-height: 1.2em;
  font-weight: 600;
}

.mycs_user .mycs_content .mycs_details .mycs_mycs_data .mycs_h3 .mycs_span {
  font-size: 0.85em;
  font-weight: 400;
  opacity: 0.5;
  color: #fff;
}

.mycs_user .mycs_content .mycs_details .mycs_actionBtn {
  display: flex;
  justify-content: space-between;
}

.mycs_user .mycs_content .mycs_details .mycs_actionBtn button {
  padding: 10px 30px;
  border-radius: 5px;
  border: none;
  outline: none;
  font-size: 1em;
  font-weight: 500;
  background: #45f3ff;
  color: #222;
  cursor: pointer;
  opacity: 0.9;
}

.mycs_user .mycs_content .mycs_details .mycs_actionBtn button:nth-child(2) {
  /* border: 1px solid #999; */
  /* color: #999; */
  background: #fff;
}

.mycs_user .mycs_content .mycs_details .mycs_actionBtn button:hover {
  opacity: 1;
}
11.为网站增加一个好看的字体
其实也没必要多说什么的。
你们看看我网站就知道了。
/*将下面的链接改成自己的即可,字体文件位置自己随意修改放置*/
@font-face {
font-family: 'AaKeAiRiXiZhongWen(JianFan)-2';
src: url('https://www.tqlen.com/wp-content/themes/CorePress-Pro/static/lib/AaKeAiRiXiZhongWen(JianFan)-2.ttf');
}
body{
font-family: AaKeAiRiXiZhongWen(JianFan)-2;
}
12.游客登录无法查看文章
在插件目录下创建一个名为【hide】的文件夹
再将以下这段代码保存到一个名为 hide-posts-from-guests.php 的文件中,并上传到您的创建的文件夹中.
然后,在WordPress后台激活插件即可。
请注意,此代码仅供参考,请务必在使用前进行测试和审核。
如果要修改展示内容请修改【抱歉,您必须登录才能查看内容。】里面的内容即可
<?php
/*
Plugin Name: 游客登录无法查看文章
Description: 这是一个游客不登录就无法查看文章的内容,可能会有主题不适配。
Version: 1.0
Author: 茗茶
*/

add_filter( 'the_content', 'hide_posts_from_guests' );

function hide_posts_from_guests( $content ) {
if ( !is_user_logged_in() ) {
return '抱歉,您必须登录才能查看内容。';
}
return $content;
}


[…] 代码来自这位大佬:CorePress-Pro主题美化教程 – 大绵羊博客 […]
你好站长,请问能分享一下![[g=奋斗]](https://dmyblog.cn/wp-content/themes/dmytheme/emojis/奋斗.png)
你的代码高亮和一键复制的教程吗。
非常喜欢。先谢了。
之前分享过https://dmyblog.cn/471.html![[g=OK]](https://dmyblog.cn/wp-content/themes/dmytheme/emojis/OK.png)